8 Easy Steps to Website Planning
This article is part of our website DIY know-how series. It will outline the website planning steps you need to take to get online in the easiest and most stress-free way possible. Our website planning process uses 8 easy steps to help you, the small businesses owner, with planning your site. It is the same process and website planning method we use when create our custom-built websites for our clients.
How This Article is Organized
Each step gives an overview of the topic and covers why the step is needed. Then, the how to tasks to guide you through each step of your website project plan. There is an article index that gives you quick links to each of these 8 steps.
When you start with our 8 step website plan you will move through your site creation process quickly and painlessly.
What We Learned About Website Planning
We believe that the process of building a website can be somewhat like baking. When you plan to bake a cake, you gather up all your ingredients before you begin and keep them within reach. Likewise, to build a website you want to have your ingredients (your results from these 8 steps) ready and with you before you sit down to actually start to make your website. Therefore, instead of a recipe, you have a Website Plan to guide your way.
Most Importantly, your website project will be setup for success when you use these 8 easy steps before you sit down to create you site or even prior to your purchase of any website products.
Materials Needed to Complete Your Website Plan
- A laptop or desktop computer is recommended. A mobile device can be used if you are able to save all your web planning notes together. You may also opt to save your notes in a paper notebook.
- Internet access via your device’s browser.
- Adequate time to work through the steps and write down your notes and thoughts for each step we will outline.
Lastly, we suggest devoting about 15 minutes per day for a week or so to complete your website planning process. It is important to note that individual work times may vary based upon familiarity with topic and how deeply you dive into the topic.
Website Planning 8 Step Index Links
Use these links to quickly navigate through these 8 steps to planning your website. You may want to bookmark this page for easy reference as you work through your plan.
- 1.) Research Other Websites
- 2.) Identify Your Site’s Customers (prospects)
- 3.) Define Your Website Goals
- 4.) Define Your Website Pages
- 5.) Plan Your Website Layout
- 6.) Plan Your Website Colors
- 7.) Acquire and Create Website Collateral
- 8.) Buy Domain Name, Web Hosting, and Website Builder Tools
Get a .PDF of this Article
We understand that you may want to download this to work through your plan or read it at your leisure. Therefore, we have added this article in a downloadable .PDF. Please fill out the form to get your copy.
8 Steps to Planning Your Website
Step 1. Research Other Websites
Your task is to search the web for other business websites that are similar to the line of business that you are in. This is not to copy what others are doing, but rather to help you establish some guidelines to use when creating your own website.
When you have predetermined the majority of your design elements within your website plan you will do less design experimenting as you build your website and more time actually getting the design you want in place.
Your detective work is so that you will learn what businesses similar to yours do well and not so well on their websites. You will also be able to identify what styles work for you and establish some personalized preferences.
Why Internet Research is Important in Website Planning
This is necessary so that when you sit down to actually make your website, you are not overwhelmed or distracted by unlimited choices.
Since you already know ( or will soon learn) what styles you prefer and want to put on your website, you will save time and get online faster.
When you have predetermined the majority of your design elements within your website plan you will do less design experimenting as you build your website and more time actually getting the design you want in place.
How to Accomplish Your Website Research
As you look at these websites, you will begin to notice what you find interesting and would like to use on your website.
When you find a particular website element that you like jot down a note in your website planning notes.
Start to make note of even the smallest detail you are interested in.
Starter List of Examples to Note During Research
- Observe if you prefer clickable buttons that have rounded or square corners.
- Identify if you like the menu navigation at the top of the website or on the left side of the website.
- Decide if a large ”hero” image at the topmost part of the page appeals to you more than a smaller image with text alongside it.
- Choose whether you like to see bright colors or more conservative colors in your website.
As you can see, the list you add to your Website Plan for step 1 can end up being quite lengthy. Next, in step 2, we will get you to thinking about your customers (prospects).
Get a .PDF of this Article
We understand that you may want to download this to work through your plan or read it at your leisure. Therefore, we have added this article in a downloadable .PDF. Please fill out the form to get your copy.
Step 2: Identify Your Site’s Customer (Prospect)
You want to create a website that appeals to your customers (prospects) and makes them want to visit it again and again. Therefore, it is extremely important that you gain a deep understanding of your customers likes, hopes, desires, and wants as part of your website planning.
Knowing your customer(prospect) allows you to connect with your customers and show that your products and services are in tune with their needs and what they want to accomplish, have, do, or be in their lives.
Why Customer Understanding is Important
Why would you care so deeply to learn about the desires, wants, and needs of your customer (prospect) when creating your website plan? We have found that this deep understanding helps you to speak to your customer (prospects). This is done through the text on your website using the voice that resonates with them and appeals to them.
Knowing your customer (prospect) allows you to connect with your customers. This connection shows that your products and services are in tune with their needs. Moreover, it shows you value what they want to accomplish, have, do, or be in their lives.
When you write your text copy (content) for your website, you can then read it through the eyes of your customer (prospect). This is because you want to evaluate this content as if you were in their shoes. Most importantly, once you have an understanding of what your customer (prospect) really likes, you are in a better position to write text copy for your website that appeals to them.
How to Accomplish This Step
Your task is to write down everything you know about your customer (prospect) into your website planning notes. Be sure to keep all your planner notes in a single location. Therefore, it will be easy for you to find later on when you actually sit down to create your website.
Step 3: Define Your Website Goals
Review what you have learned about your customer (prospect). As you think about your customers, identify what they would visit your website to do. Customers (prospects) can come to a website to take a number of actions.
Your website plan will link these desired actions to the text in your call-to-action buttons. If you aren’t really sure about call-to-action buttons, don’t get hung up on them right now. Later, we will dive into more detail on these in the how to portion of this step. You might remember seeing some of these buttons or links in your website research:
- Call Now
- Read More
- Buy Now
- Download Now
- Click for More Information
The goal of your website copy is to sell your products and services. A call-to-action helps customers (prospects) take steps toward this goal.
Why Define Website Goals
Why would you want to outline this level of call-to-action detail before you sit down to make your website? Building your own website can be a daunting task. When you set your hands to the keyboard to start, it is critical that you have focus. Without focus of knowing the goals of your website, you could wind up flailing and frustrated as you work on your site.
Exasperation might even cause you to get stuck or stalled. We want to prevent this from happening.
Each step of our plan is designed to add more and more clarity to the details you will need to know to make your website a reality!
How to Define Website Goals
Keep your customer (prospect) list created in step 2 nearby when working on your website planning steps. Next, create a list of actions that you want your website visitors to take when they visit your website. These will be your call-to-action buttons for your website plan. Beside each action write down what type of page you will need to have to perform that action. Lastly, make sure you look at all the needs and wants of your customers (prospects) that can be linked to what your business will offer on your website.
Sample List of Goals Linked to Call-to-Action Buttons
Review each of these and add your own to this list and update it as you see fit. The list is formatted to show Call-to-Action, then goal of website visitor when they click on the call-to-action button.
1.) Product A – Buy Now Button . When my website visitor clicks on this button they need to be sent to a web page that has details on how to buy Product A.
2.) Product B – Buy Now Button. When my website visitor clicks on this button they need to be sent to a web page that has details on how to buy Product B.
3.) Products we offer – Read More Button. When my website visitor clicks on this button, they need to be sent to a web page that has details on the products you want to feature.
4.) PDF Brochure – Download Now Button. When my website visitor clicks on this button, they need to be able to get a link to my PDF brochure.
Next, to complete this step, you will create your personalized list in your notebook or on your laptop. Feel free to use our list as your starting point.
From this analysis, you will end up learning how your goals link to your call-to-action buttons. And how they also match up with your customer (prospect) wants and desires.
What You Get Out of This Analysis
You will see how this steps the stage to help define a few of the pages you will need for your small business website planning purposes. Lastly, keep this list handy as you move to the next step in your site planning process.
Get a .PDF of this Article
We understand that you may want to download this to work through your plan or read it at your leisure. Therefore, we have added this article in a downloadable .PDF. Please fill out the form to get your copy.
Step 4: Define Your Website Pages
You should aim to keep this list is small as possible for you to be able to go live with your website. Additionally, keep in mind that new pages can always be added after your go live date. You may want to add a section to your notebook that has the highest priority pages that you absolutely must have to roll out your website to the world. Likewise, make a second list that has other desired pages you want to add.
Be ruthless about the bare minimum web pages that you need so that you don’t get stuck in an endless building cycle before you are freed to go live with your website.
Why You Need a List of Your Web Pages
When you begin to build your website, you will want to have a list of the most needed pages you should start with. This upfront effort will be rewarding when you jump into your website building tool and know exactly what pages you want. It will prevent you from building pages that may not be needed or important. And, this is really is another step to help you stay focused on the task and not flailing from one thought to the next as you work.
In addition to staying focused, this step will help you figure out the bare minimum pages you need to have to go live. Therefore, you can put the other pages that you would like to have on the back burner and perhaps target adding a few each month.
How to Identify Your Most Needed Website Pages
The core pages needed for most websites are a Home Page, an About Us Page, and a Products or Services Page. This is a good list to begin with plus add on any of the pages you identified in your identify your goals from step 2.
You may opt to have all your products and services listed on a single page or you might decide that it would better suit your customers (prospects) to have a product page for each individual product. If you listed out a product or service page for each Buy Now call-to-action button, you will want to add pages for each individual product to your website plan.
Managing Overlapping Call-to-Action Links
If you have a Read More Call-To-Action Button that you expect to link out to the same content, then you will only need a single page. Note that both of your Read More Call-To-Action buttons will call out to that page and will be part of your website building plan.
Your task is to create a web page inventory for your website plan in your notebook. Based upon the goals we just talked about and the needed core pages, we can create a list of the needed pages. Additionally, your starting web page inventory should include a very high-level description of what the expected topic is for the text (written content).
Example List of Pages
This is an example of how you might create your list. You can use this as the starting point for yours and change it and add to it as meets your website needs. Review all you goals and be sure you have them covered. Finally, assess each for criticality for your go live.
Be ruthless about the bare minimum web pages that you need so that you don’t get stuck in an endless building cycle before you are freed to go live with your website.
Website Plan Primary Page List
1.) Home Page will have a Call Now button. The text copy on this page will describe who you are as a business and what you offer. A Must Have for Go Live.
2.) About Us web page will have a Contact Us button. The text copy on this page will tell the story of how your business came about and what value you bring to your customers (prospects). A Must Have for Go Live.
Website Plan Additional Page List
3.) Product A web page will have a Buy Now Button. The text copy on this page will describe the benefits your product gives your customers (prospects) when they purchase it. A Must Have for Go Live.
4.) Product B web page will have a Buy Now Button. The text copy on this page will describe the benefits your product gives your customers (prospects) when they make a purchase from you. A Must Have for Go Live.
5.) Product Offerings web page will have multiple Buy Now Buttons for each product. The written text copy will have a brief description of each product you offer. A Must Have for Go Live.
6.) Download Offering web page will have a link or button to give my customers (prospects) the ability to download a text pdf document. The written text copy will highlight facts about your business and offerings. A Nice to Have for Go Live.
7. Contact Us web page will have complete information about the various ways your customers (prospects) can contact you. You may opt to include a web form so that they can submit questions to you via email. A Must Have for Go Live.
Links to Key Page How To Articles
Always Ask for Action
Every web page in your website plan should have a call-to-action including your About Us Page and your Home Page. Most importantly, the purpose of each page on your website is to offer information to your customers (prospects) about you and what you can offer.
The goal of your website copy is to sell your products and services. Moreover, a call-to-action on each page and key section, helps customers (prospects) take steps toward this goal.
Get a .PDF of this Article
We understand that you may want to download this to work through your plan or read it at your leisure. Therefore, we have added this article in a downloadable .PDF. Please fill out the form to get your copy.
Step 5: Plan Your Website Layout
If you take a look at your website research from step one, you will see that there are specific patterns that you found and liked. You have written these down and know you want to use these in your website. Also, you also want to take into consideration the common layouts for your most needed website pages.
Consistent Experience Aides Website Navigation
Having page layouts that are consistent with what is out there on other websites helps your customers (prospects) to be able to use your website. A couple of other website elements that help do this job are your website navigation and footer design.
Each step of our plan is designed to add more and more clarity to the details you will need to know to make your website a reality!
Website navigation is a website layout planning item that you need to consider. You want to nail your design of both your overall website navigation and footer areas. Putting this in your website layout planning ensures consistency with these two design elements across your website. This is so that your customers (prospects) will be able to come to your website and find what they are looking for without too much effort.
Why You Need to Plan Your Website Layout
Why would you want to plan your website layout? Designing something confusing to navigate for your customers (prospects) you will be making them work too hard. If this happens, they will click away and go elsewhere. Most importantly, you have lost the opportunity to convince them just how great your products and services could be for them!
How to Add Page Layouts to Your Website Plan
There are some common layout design patterns that will help you move through this step quickly. Above all, keep in mind there isn’t a need to re-invent the wheel. This is good news because it will save you time and effort when you sit down to build your site.
Some Common Layouts
If you are worried that your site may look like every other website, keep in mind that your images, text copy, colors, and personality will make your website unique and different from everyone else’s. Therefore, it is okay to use layouts that your find in use on other websites.
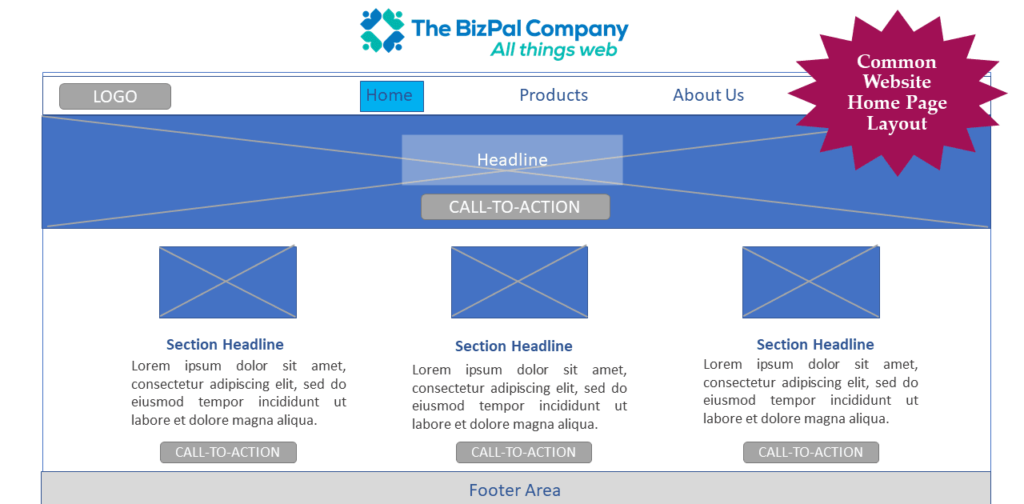
A Typical Home Page Website Layout
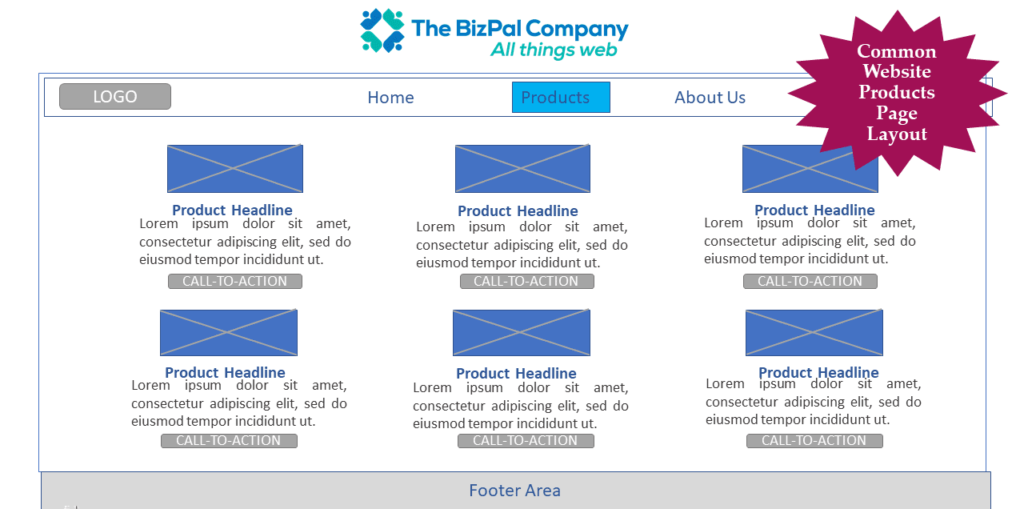
An Example of a Products or Services Web Page Layout
About Us Page Layout – can also be used for any single page that you wish to have and image, text copy, and a call to action.
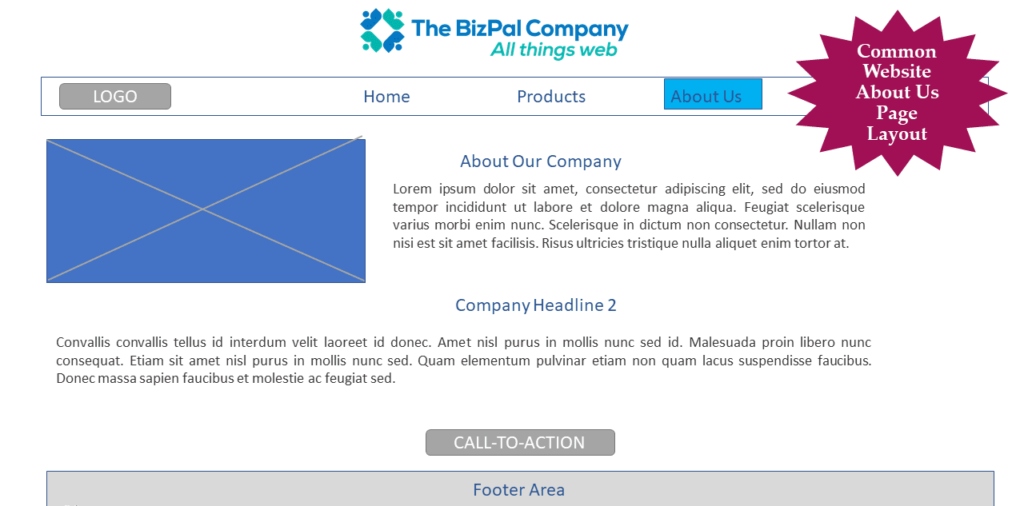
You will note that the navigation for this entire website layout features a top most right position in the web browser. As we noted before, this position must remain consistent across all the pages on your website. Similarly, please note that each page has a footer. Likewise, your footer must remain constant across all your web pages.
More About Website Footers
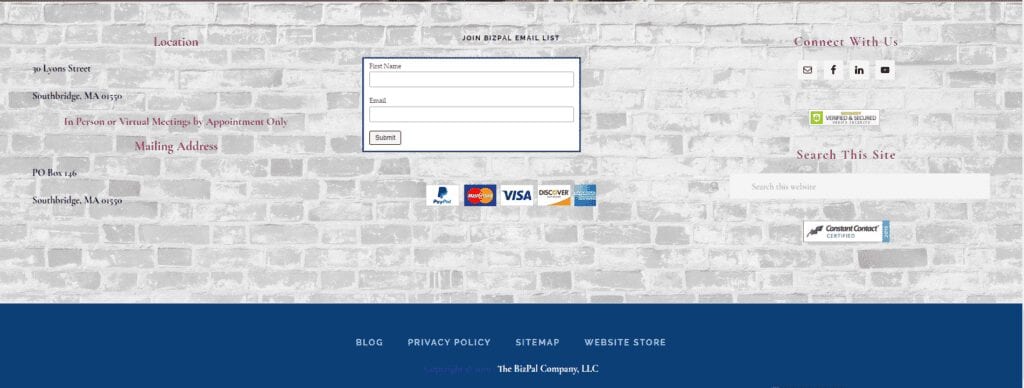
The footer area can be used to feature your affiliations and awards, your company contact information, your social media buttons and links, your email list sign-up forms, and quick links to other parts of your website. Moreover, your copyright notice also is positioned in the footer of your website.
Footer Example
To give you an idea of what this detail might look like, here is an image of The BizPal Company, LLC.’s Footer.
Usually each page of your website can be reached via the navigation and footer links.
Links to Website Navigation and Footer Articles
Duplicate Content Considerations
We opted to implement our affiliation buttons on our homepage and on a few of our other key pages. Therefore, we are showing you a screen clip of our Affiliations and Memberships for reference.

Duplicate Content Gotcha’s
It is your decision as to whether you want locate your affiliations and memberships in your footer or on several selected pages. We do caution you that if you place this content on multiple pages, you will need to track it. This is so that you will know where you have placed it when it comes time to update or add anything. Not to mention that if it exists in a several places, it could be easy to overlook and forget where it is located. Unfortunately, this could lead to inconsistent information on your site.
Get a .PDF of this Article
We understand that you may want to download this to work through your plan or read it at your leisure. Therefore, we have added this article in a downloadable .PDF. Please fill out the form to get your copy.
Step 6: Plan Your Website Colors
Color is an important visual design element for your website. If you are looking to create a specific image, you might want to do a Google search on the Psychology of Color. Primarily, you will find that various colors convey different meanings. Likewise, you may decide that you want to use color to assist in creating the impression you want to make.
Color sets the tone for a brand and has the power to speak to your customers (prospects).
Color Guidelines
Of course there are some color guidelines to follow from a website graphic design perspective. When you build your website, you want to keep your color scheme to two to three colors. Furthermore, this is besides the black or very dark grey for your text and white and very light greys for some of your background highlight areas.
First, you want to use a color that has a high contrast and pops to attract attention for your call-to-action buttons; highlights for your menu selected choices; and perhaps your footer area. Additionally, a color wheel can help you decide what works with your color scheme if you only have a two-color logo or monochromatic color scheme.
Why Your Color Scheme is in Your Website Plan
Deciding ahead of time what your website colors should be and how you will use them strategically on your website has a few of purposes. Next, we will go into a little more detail about the use of color for your website.
Three Reasons to Select Colors During Planning
First, color sets the tone for a brand. Lively colors indicate high energy and more subdued colors may be considered more traditional. Besides, some products pair better with either choice.
Second, knowing how and where you will place your color on your website ahead of time is another time saving strategy which is essential to your website plan.
Third, when you have the various codes from the color systems documented you can always find the exact color code you need now or later. Primarily, you will need to know these various color codes in the following situations:
1.) Adding new pages and sections to your website.
2.) Ordering printed business cards and flyers.
3.) Buying other promotional materials that may need your branded colors.
Lastly, we will talk about in these color code systems and how you can easily find those that match your color scheme in this section.
Website Design and Planning is Customer Centered
As you work with color, you need to keep website visitor usability top of mind when picking colors. Because usability by your website visitors is important, we will give you a very high-level definition of this term. Usability is a website design term which describes design elements that make it easy for a person to use a website. It is important to realize that one of these usability elements has to do with choices for your core text color on your website.
Some Color Basic Rules of Thumb
To be sure, good color choices and clear contrasts make the text easy to read. Because this keeps visitors on your site longer. You will find that making your color decisions upfront takes the guesswork out of this task when you sit down to work on making your website. Moreover, you will speed up your web page creations time if you have each of your colors along with its color code.
How To Outline a Website Color Scheme
We have found that there are a couple of approaches to take. Either you can use your logo colors or you can create a color scheme. When you have a logo, your color choices can be pulled from the colors used in your logo. Alternatively, don’t worry if you don’t have a logo as you can do a Google search to find web color schemes. Essentially, this search may help you decide what might be best suited for you and your customers (prospects).
If you have a logo which was designed by a graphics designer, ask them to provide you with the color codes for Pantone Color Codes, Hex Color Codes, and RGB Color Codes. These are the color code systems we talked about a few paragraphs ago. Very shortly, we will go into a little more discussion about this confusing topic.
Two Primary Color Decisions for Website Planning
Whether you have a logo or you are creating your color scheme without a logo, the color decisions you need to make are the same.
1.) Accent Color – This is used for call-to-action buttons and links. Additionally, it may also be used for color of the selected text for your navigation menu, and footer background color.
2.) Navigation Menu Color – This requires a text color, a background for the text menu navigation and a highlight color for the currently selected page.
Besides these two choices, a white background is a good website design choice. You will find that text, images, and other design elements look crisp on a white background. Note that content areas are frequently highlighted with a neutral grey shade such as the one used in this next paragraph.
When you use a white background makes it easier to select the colors for your color scheme since it is neutral. In contrast, a black background can also work but might be more challenging to pair colors and have distinct color contrasts. Therefore, we recommend using a white background to make your design process smoother.
Frequently, many websites use a solid black as their footer background color or a background image. This choice is a matter of personal preference. But care must be taken to ensure that the color chosen coordinates or compliments the website’s color scheme. But it is important to note that if you choose a pattern, it must be subdued enough to allow readable text to be placed on it.
Website Planning for Color Code System Usage
At times, depending upon the website building tool that you use, you need color codes in what is called hex format. In addition, sometimes an RGB code is needed too. Sometimes a graphic designer may only give you a Pantone Color Code. Therefore, you may need is to translate these color codes from one format to another so that you can pick the correct color that matches your logo or desired color scheme when you begin to work in your website building tool.
Before you begin to actively build your website, your goal is to have each color’s usage and related color codes documented in list format. Lastly, here is a sample of what one item in your lists would look like for your call-to-action buttons:
Website Plan for Call-to-Action Button
Call-to-action button, blue, hex color code: #34558B , RGB color code RGB (51, 85 ,139) , Pantone Color Code 19-4052 TPG
Now, note each color you have identified in your color scheme with these 3 codes. Skip to the next section as resource to translate your color codes. You will find that having these color code values handy will make it easier when you are working on creating your website.
How to Translate Color Codes
A great resource to translate color codes from one format to another can be found at Pantone.com.

This color code in the Pantone Color System is shown to the left. Additionally, keep in mind that print colors, fabric colors, and paint colors differ when displayed on computer devices.
The color codes that are closely matched to these for computer colors are:
RGB: (51, 85 ,139)
HEX: #34558B
Get a .PDF of this Article
We understand that you may want to download this to work through your plan or read it at your leisure. Therefore, we have added this article in a downloadable .PDF. Please fill out the form to get your copy.
Step 7: Acquire and Create Website Collateral
In this step, your primary goal when creating content is to write copy that will keep those who visit your website from clicking away. Choosing your imagery together with your written word will go hand in hand to do this job. Therefore, the website collateral ( text, images, call-to-action buttons, video, podcasts, colors, and overall design) are critical elements that must be considered when you create your website plan.
Write too much copy and you will overwhelm your website visitors. Moreover, this may cause them to click away before they get to really know what you and your business are all about.
Less us More when writing text copy for your website.
Why Creating or Acquiring Website Collateral During Website Planning is Needed
We have stated this before in our article, but it is such an important point that we wanted to mention it again. The primary goal of your website is to sell your products and services. Besides, positioning your company in the best light possible to do this job takes some elbow grease. The words you select are important. If you leave creating the content to do on the fly, you risk shoddy content. Equally important are the images, videos, podcasts, and headline you choose to use to support your words.
These design elements, called website collateral collectively, are the tools you have to create a website that your customers (prospects) want to stay on and explore. Not to mention that this lets them learn about all the great products and services you can offer them.
Write too much copy and you will overwhelm your website visitors causing them to click away before they get to really know what you and your business are all about.
According to The Neilsen Norman Group most people will click away after 10 to 15 seconds. Therefore, you can see why it important to get what you write crafted to capture their attention. Moreover, this makes is a necessary part of your website planning.
Always keep in mind that less is more when writing text copy for your website.
Visual Elements Compliment Design and Message
The composition of your visual elements together with your text copy are critical design elements to your website planning efforts. When you write your text copy (content) for your website, you can then read it through the eyes of your customer (prospects). This is done so that you can evaluate this content as if you were in their shoes.
Building Out Your Website Collateral
In this next section, we will cover how to identify your text copy, website images, videos, and podcasts. Additionally, we will also cover downloadable .PDFs. Although .PDF documents exist externally from your website copy, they form part of your website marketing and need to be considered in your site plans. We believe it is a best practice to have these ready to roll and available for you to use when you are in the middle of working on getting your website built.
Creating Your Text Copy for Your Site
Next, revisit your list of needed website pages created in step 4. You will need to write concise compelling content for each page and page section you identified. As you write for each page and section, pencil in a note about what image, video, and optionally podcast media would support your message. Lastly, this exercise will help you connect the dots and fully identify all the collateral needed to complete any web page on your website plan.
Write too much copy and you will overwhelm your website visitors causing them to click away before they get to really know what you and your business are all about.
Identifying and Finding Website Images, Videos, Podcasts
After you have written your copy, you will now need to seek out images to support your written text. If you are working with a graphic artist, you can use the list of concepts related to your pages that you have developed to communicate what you need for images to them.
Finding Your Website Images on the Web
We have a few articles on the topic of sourcing your images on the web. You can review our favorite image sources by clicking on this link. Always be certain that you have clear usage rights for your images. It is extremely important to note that images found on other people’s websites are subject to strict copyright laws. And, it is always necessary to Know the Usage Rights of Images you select for your website by reading our post on this topic and doing your own legwork. Also, consult with Our Article on Creative Commons Image Licensing. Be aware of what you can and cannot use freely.
Our Three Tips on Working with Website Images
Determining Needs for Downloadable .PDFs
If you have one or more pages that need a .PDF download file, you will want to write the copy for each of these before you start to make your site. Each page that has a different downloadable .PDF will need to have its own file. Note that when you have a single file downloadable from multiple places on your website, you will only need a single copy.
You will find it a best practice to write the copy for each of your needed .PDF download files before you start to make your site.
Get a .PDF of this Article
We understand that you may want to download this to work through your plan or read it at your leisure. Therefore, we have added this article in a downloadable .PDF. Please fill out the form to get your copy.
Step 8: Buy Domain Name, Hosting, and Website Tools
Why you need a Domain Name, Hosting, and Website Building Tools
To get started on your website you need to have a domain name and register your domain name with a registrar. Additionally, you will need a place on the web to put your website, and the software to create it with. Hosting can be looked at as the place you put your website on the internet. The software can be a website builder tool or WordPress. This final step of your website planning efforts is to make decisions about your domain name, website hosting, and website building purchase.
There are a great many other varieties of website builder software tools and hand coding methods with HTML ( the language of the web) but we will look at the most common choices for those who build their own websites.
Although you may always opt to have your website built for you, this final step will mostly cover choices for those who want to build their own websites. We have created a few key questions to help you evaluate whether you should build or buy.
About Domain Names
The domain name is the friendly name you setup to match your business name or brand. Click here for more information about domain names. Additionally, there are many new choices for the extension used as a part of your domain name.
Consider Alternative Domain Name Extensions
You may want to consider reserving alternate versions of your domain name so that another business doesn’t start developing a site on a similar name and cause confusion for you later on. For example, we reserved https://www.thebizpalcompany.com and https:BizPalcompany.com These two names are synonymous. We would not want to see someone else reserving the second version and creating brand confusion for us.
Additionally, there are a wide variety of extensions that you can reserve besides the .com. You may want to consider reserving other extensions such as .net, .business, .digital, .info, .biz, etc.
Find Out if Your Preferred Name is Available
Note: Using the domain name search above will take you to The BizPal Company’s Website Shop. We are able to help you with all of your website product needs.
You can reserve any domain name not used already. You may check to see if the domain name you want is available and register it using the search box just above this text.
About Web Hosting
Hosting is generally a service that you pay for. This service is needed so that your website pages can be shown on the internet. You could try to host a website yourself but it would take a great deal of technical know-how and computing power to do so. Both of those needs translate to a high cost in time and money. Therefore, most small business opt to outsource these services to a hosting provider who has the staff, skill, and needed computer hardware to provide you with the service at an economical rate. Most times your hosting services are bundled with your website building tools.
About Website Building Tools
You will find that there are a wide variety of website building tools on the market. As we noted earlier, website hosting costs are typically bundled in with your website building tool purchase. For this reason, you generally won’t see the hosting costs as a separate line item when you make your website products and services purchases.
Two Types of Website Building Software for Small Business
We believe that for the small business owner, there are two varieties to consider. First, are the all-in-one website builder tools such as Our Website Builder Tool. Secondly, there are the content management website tools such as WordPress. There are others in both of these categories, but we will only focus on these two website building tools in this article.
All-in-One Website Builder Tools
The all-in-one website builder tools come with an extensive list of time savings features. Some of these are pre-built templates that allow you to replace images, text, colors, etc. with your own collateral. The best ones have easy to use point and click, as well as drag and drop features. These simple to use tools work well because they mimic the style of building documents that you use in your day to day life. They also provide a WYSIWIG (What You See Is What You Get) interface that lets you pre-view your work as you go along. This makes designing your website a lot easier when you can see how your changes look by hitting a preview button.
Additionally, these types of tools do not usually need you to have to learn deep technical skills about domain name management. They typically allow publishing your website with a one click button. Our Website Builder Tool has all these must have features and more. You may pre-view a 3- minute demo of Our Website Builder Tool by clicking on this link.
Content Management Tools – WordPress
You will find that WordPress can meet the needs of a wide variety of websites. It is highly customize-able with virtually an infinite number of visual designs, software features, and third-party integrations. Although there are other content management website building tools, WordPress is our top choice because it can be used for any type of business or blog and can help you put in place pretty much any feature that you want to add to your website. Click here to read more about why to consider using WordPress.
However, the benefits of WordPress do have tradeoffs in terms of a high learning curve. It can also be challenging for those new to websites and website design to make their page look aesthetically pleasing without having a visual model to guide them. If you have ever stared at a blank canvas during an art lesson, you will certainly understand how this could be a website show stopper.
Because of the high learning curve and the longer time it takes to make a website build with WordPress, you want to evaluate your answers to the following questions carefully before you purchase your website building tool.
Key Website Builder Tool Decision Factors
When you are deciding upon a website building tool, there are a few key questions to ask yourself:
1.) Do you have a high tolerance to learn technical skills of more complicated software packages?
2.) Does your timeline for getting online allow you to take a longer time to learn and ultimately build your website?
3.) Will you be able to develop an eye for designing your pages from scratch?
4.) Are you planning to have a lot of integrations with third party providers that may require customized computer software elements?
Evaluate Your Website Building Answers
You will need to honestly evaluate the answers to these questions. A “no” answer to questions one and two will point you in the direction of an all-in-one website builder tool such as The BizPal Company’s Website Builder Tool.
Answering “yes” to all these questions would point you in the direction of considering a website builder tool such as WordPress. Moreover, if you answered “yes” to all 4 questions, you may want to also evaluate a custom-built website. We can assist you with purchasing a WordPress solution that you either built yourself or we build for you.
The BizPal Company Has Website Solutions for You
The BizPal Company does create custom-built WordPress websites or websites built with our all-in-one Website Builder software tool. Note that a website built for you with the all-in-one tool tends to be more economical than their WordPress custom-built counterparts.
How to buy a Domain Name, Hosting, and Website Building Tools
Buying a Domain Name from a website service provider is a relatively easy task. There are very few variations on this website product. Mostly, the options that you get to choose from are the duration of your domain name registration.
Here is How to Buy Your Domain Name:
- Do a search to see if the name you want is available. Type or past this url into your browser: https://shop.thebizpalcompany.com/products/domain-registration/
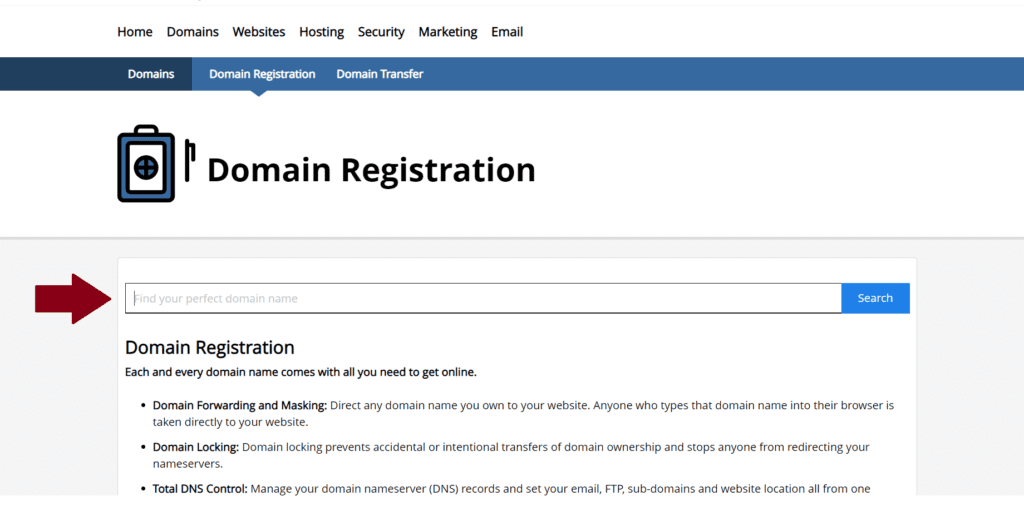
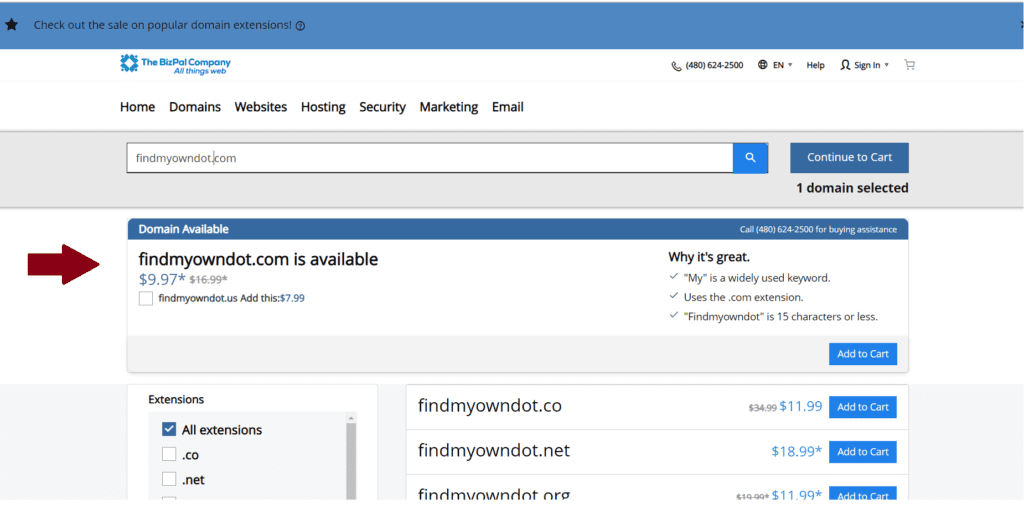
Once you have typed in the domain name you want you will find out whether it is available for purchase or not.
Step 8 – Figure 2 shows what you will see if the domain name that you want is already taken. This search will also show you some suggested alternative names (screen shot here doesn’t show this) which you might like.

If the domain name you want is available you will then be able to add it to your cart.

- Next Add to Cart
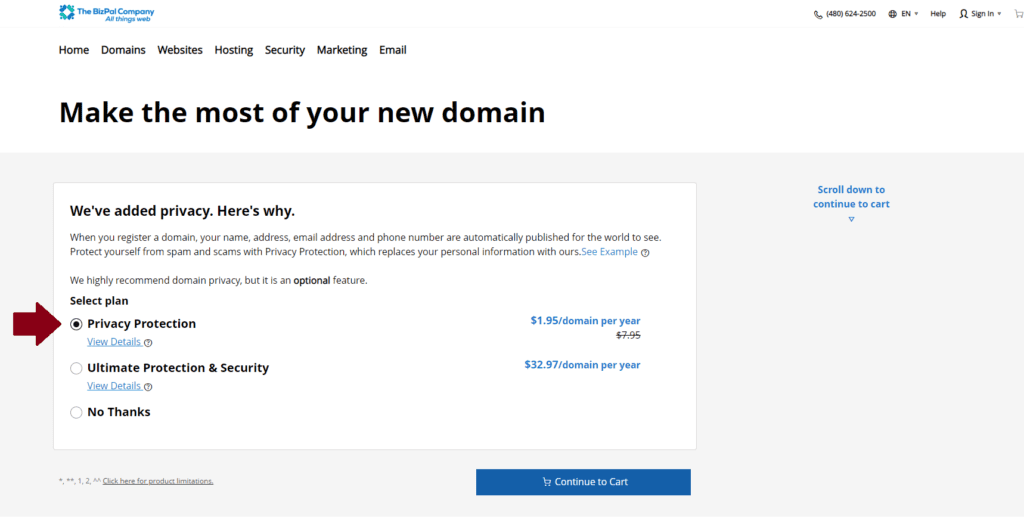
- Add Privacy Protection ( optional but recommended, click here to find out why)
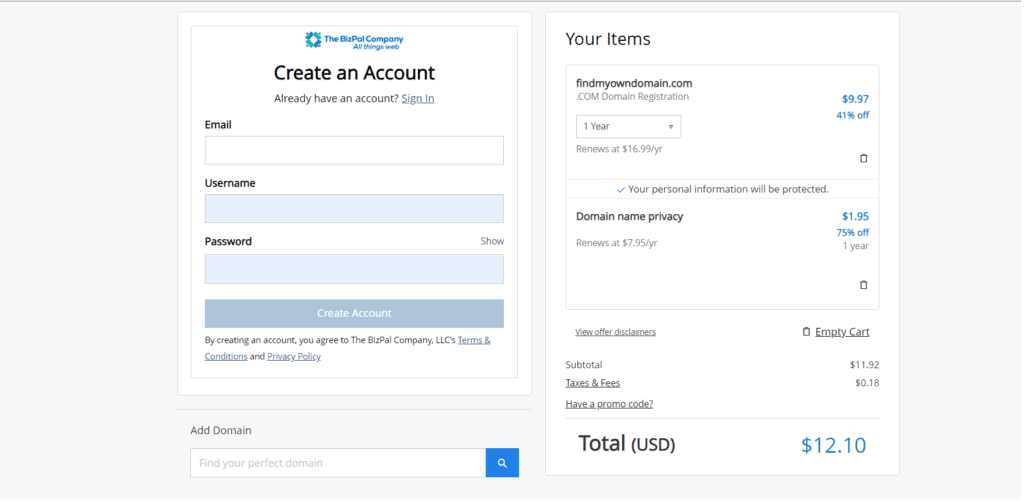
- Select Domain Registration Term 1 year, 2 years, 3 years, 5 years, or 10 years.
- Next, create your account. You will next get prompted to complete your purchase by putting in your credit card options.
Our Website Builder Plan Options
We offer 3 Website Builder Tool Packages. Our recommendation is the Website Business Builder Plus as it offers a wealth of features. Here is a feature comparison of these three plans side by side.
Use the scroll bars to right and at the bottom move through the 3 Website Builder Plans in the next table. The full table is visible for desktop viewers. If you are on a mobile device, please note the scrolling instructions.
| Website Builder Features | Personal | Business | Plus |
|---|
Annual Pricing | $ 71 88year | $ 119 88year | $ 179 88year |
| OR | OR | OR | OR |
| Monthly Pricing | $ 5 99month | $ 9 99month | $ 14 99month |
| Responsive Mobile Design | |||
| Website Hosting | |||
| Rapid Page-Load Performance | |||
| Create a Blog | |||
| Security (SSL) | |||
| 24/7 Support | |||
| PayPal Buy Now or Donate Button | |||
| Search Engine Optimization (SEO) | |||
| Social Media Integration | |||
| Share Content on Facebook | |||
| Online Appointments | |||
Ratings | Good | Better | Best |
Here is how to buy your all-in-one Website Builder Tool :
1.) Navigate to https://shop.thebizpalcompany.com/products/website-builder
You will see three plan choices. We have highlighted our recommended plan with a red arrow.
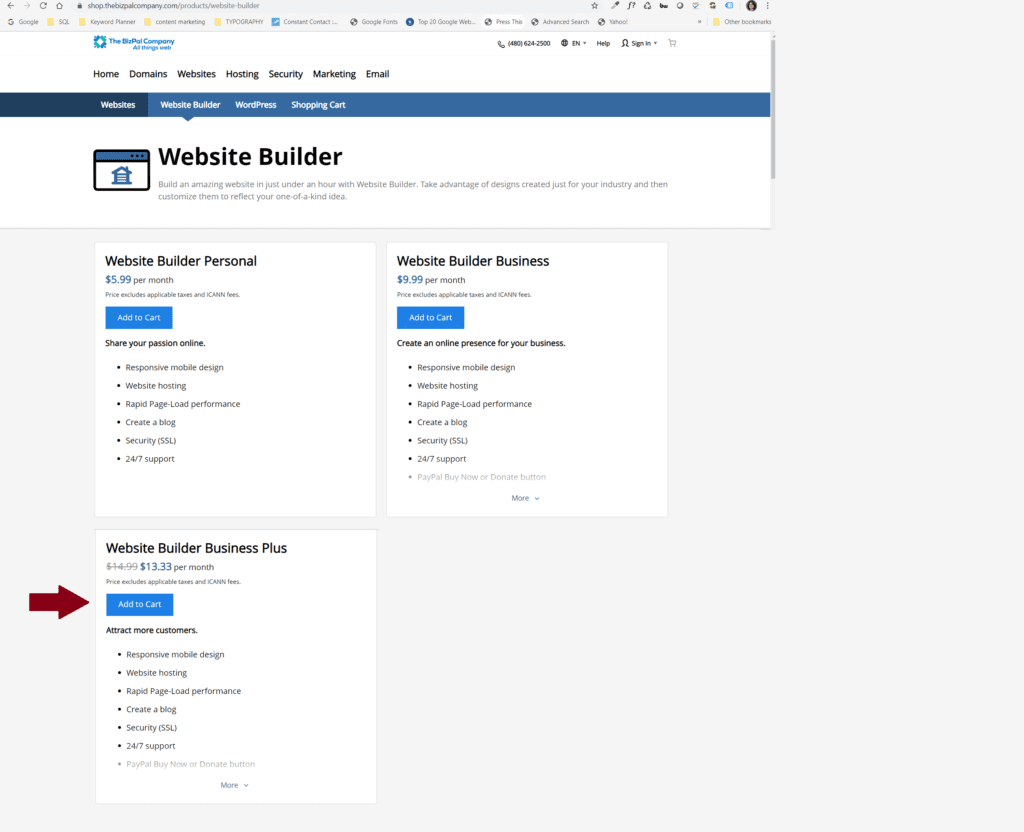
2.) Add Website Builder Business Plus to Your Cart
3.) Select your plan renewal duration. We recommend that you select the annual plan. However, take a look at our post that compares our Annual Plan to the Monthly Plan. This will help you to see these options side by side so that you can make the decision which best fits your website plan budget.
WordPress Plan Options
When you want to buy a WordPress Hosting Plan, you might get confused with the choices that you need to make at checkout. There are a lot of choices that you must make when selecting WordPress. For the most part, you can pick the minimum viable option, Our WordPress Ultimate Hosting Plan. More information about this plan and all of our WordPress Plans can be downloaded. Simply leave your email in the form below, and we will rush your copy to your inbox.
Here is how to buy WordPress:
For most business concerns starting out, the WordPress Ultimate Hosting Plan @ $16.99 per month would meet your needs. Unless you are looking for an e-commerce option, then you would want the WordPress Ecommerce Plan @ $29.99 per month. If you would like to download the full comparison, please click on the link below.
You may use the link below to buy your WordPress with Hosting for the Ultimate package that we have recommended.
Get a .PDF of this Article
We understand that you may want to download this to work through your plan or read it at your leisure. Therefore, we have added this article in a downloadable .PDF. Please fill out the form to get your copy.
Ready, Set, Go! Time to make your website!
In conclusion, we have covered the 8 steps to help you plan your website like a pro! Each of these steps are tried and true because we gained them through trial and error and real-life experience.
Additionally, we have outlined the design choices that you need to make to create a successful website. These choices cover your written word, images, color, design, and messaging to your customer (prospect).
Your next website planning decisions are up to you. Keep in mind that your website building tool choice should match your abilities and timeline to go live. The BizPal Company offers website products and services to match your website goals.
How do you want to move forward with your website project?
- I want help to plan my project
- I am ready to buy my domain name
- Help me to buy my All-in-One Website Builder Tool
- Take me to WordPress Plan Choices (building my site myself)
- I want to have my WordPress website built for me
- Show me info about having a startup website built for me
Get a .PDF of this Article
We understand that you may want to download this to work through your plan or read it at your leisure. Therefore, we have added this article in a downloadable .PDF. Please fill out the form to get your copy.


